
Webflows: Defining and working with global steps
Creating and using Subflows
NOTE: It is expected that you have worked through the quick start tutorial before preceeding to work through this guide.
Introduction
Subflows are effectively mini webflows that can be inserted into full webflow definitions. These are really useful for common flows such as login/registration and payment flows. But you may think up your own flows also.
Step-by-step guide
1. Create the subflow definition
YAML Definition file/s
First, create another global step. The recommendation is to always use global steps for your subflows so that global defaults can be defined. Copy and paste the following yml into a file at {webroot}/application/workflow/webflowSteps/tutorialStep2.yml:
id: tutorialstep2
And the folowing properties file at {webroot}/application/i18n/webflow/step/tutorialstep2.properties:
label=TUTORIAL: Global step 2
description=The simplest of steps to demo subflows
Next, we'll create the subflow. Copy and paste the following yml into a file at {webroot}/application/workflow/webflowSubflows/tutorial.yml:
id: tutorialSubflow
steps:
- $ref: tutorialstep
  subflowEntryPoint: true

- $ref: tutorialstep2
  subflowExitPoint: true
NOTE: the subflowEntryPoint and subflowExitPoint properties are not strictly necessary here (the first and last steps will automatically be given these properties). You will need them, however, if your subflow has multiple entry/exit points due to conditional steps and multiple paths.
Some i18n
And the folowing properties file at {webroot}/application/i18n/webflow/subflow/tutorialSubflow.properties:
title=TUTORIAL: Subflow example
description=The simplest of subflows
2. Include your subflow in a webflow
Let's modify our webflow from the quick start tutorial. To include a subflow, use the $subflowref property in place of a step id:
version: 1.0.0
webflow:
  id: webflowtutorial
  singleton: true
  steps:
  - id: introduction
  - id: aform

  # subflow definition
  - $subflowref: tutorialSubflow

  - id: alternativeending
    condition:
      ref: bool.IsTruthy
      args:
        value: $aformfield
    finish: true

  - id: ending
Reload your application and play with travelling through the flow. Also checkout the workflow diagram in the view webflow screen in the admin, it should look something like this:
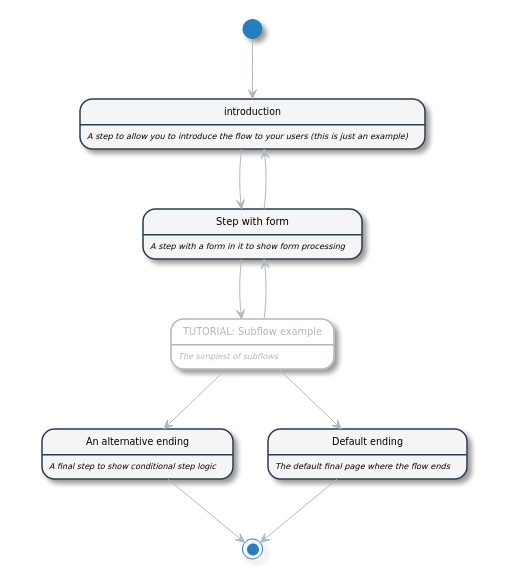
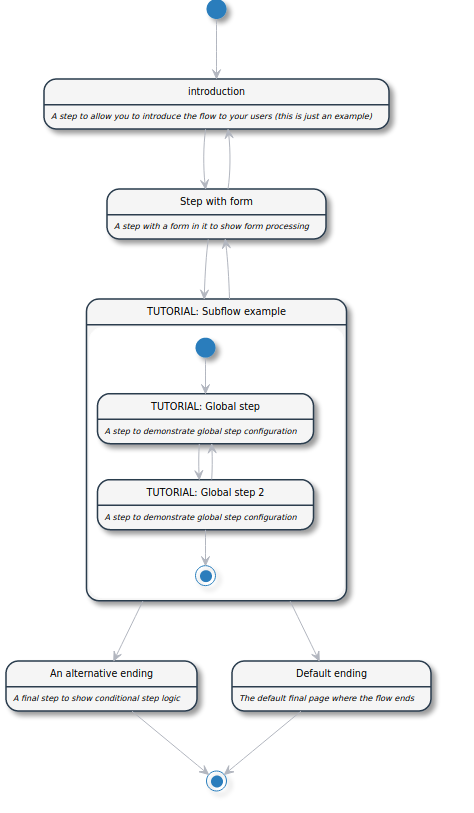
Notice how the subflow is greyed out. If you click on the diagram, you should be presented with a "full" SVG file of the flow with subflows expanded:
3. Supplying conditions, actions and config to subflows
Modify the quick start tutorial webflow once more:
version: 1.0.0
webflow:
  id: webflowtutorial
  singleton: true
  steps:
  - id: introduction

  - id: aform
    next:
    - tutorialstep
    - ending

  # subflow definition
  - $subflowref: tutorialSubflow
    config:
      aCustomFeatureFlag: true
    condition:
      ref: bool.IsTruthy
      args:
        value: $aformfield
    next: alternativeending

  - id: alternativeending
    finish: true

  - id: ending
Reload the application and see what has changed. Notes:
configon a subflow will be added to thestepConfigof all steps in the subflowconditionon a subflow will be applied to all entrypoint steps in the subflownexton a subflow will be applied to all exitpoint steps in the subflowprevon a subflow will be applied to all entrypoint steps in the subflowpreactionson a subflow will be applied to all entrypoint steps in the subflowpostactionson a subflow will be applied to all exitpoint steps in the subflow